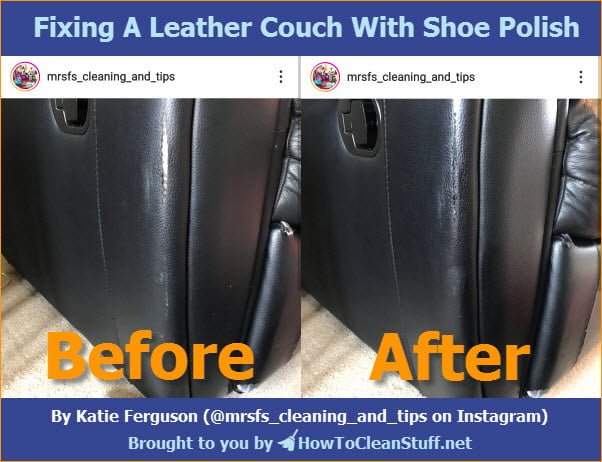
There are many tips about this going around that we’ve seen – some people saying it works, and others saying that it doesn’t – or more specifically, that it won’t soak into the leather and will instead soon be found on someone’s clothing the next time they use the couch. Luckily for all of us, Katie Ferguson, a mother of two with an Instagram account dedicated to cleaning & home topics (her account has unfortunately been deleted) recently tried this method herself and what we learned from her is that this method can indeed work well. Here’s what Katie did to achieve the great results you see below.

You Will Need:
- Two cloths
- Dish liquid
- Water
- A bowl
- Shoe polish that contains wax
Steps to Fix a Mark on Leather with Shoe Polish:
- Begin by cleaning the area well to remove any dirt or body oils that could be on the surface of the leather, which would make it more difficult for this method to work. (The oils or dirt could prevent the shoe polish from adhearing to the leather and drying.)
- To do this, mix a couple drops of dish liquid in a bowl of water to make suds, then wash the area with the soapy water.
- Finish by wiping the area with plain water to rinse and pat the area dry with a dry cloth.
- Apply a very small amount of shoe polish onto a cloth and wipe the polish over the area on the leather that needs to be fixed. Be sure to choose a shoe polish that contains wax; the polish that Katie used is Kiwi Shoe Polish. Here is a video of Katie applying the shoe polish to the couch.
- Wait several hours, then rub a cloth over the area to ensure that the polish has fully dried and no polish is transferred to the cloth. If any polish is transferred to the cloth, continue wiping the area while rotating to a clean section of the cloth each time until no more polish is transferred to the cloth. Here’s the proof this method can work: Katie sent us a video of her testing the area with a white cloth and as you can see, no polish is transferred to the cloth even with a good scrub!
Why Wouldn’t This Method Work?
The reason this method may have worked out so well for Katie is not only the light application of shoe polish that she used, but also the type of polish that she chose: one that contains wax. Cream or oil-based shoe polishes work differently and depend on their ability to soak into the leather material, which could be prevented by leather that has already been treated with an oil or conditioner, which would prevent the polish from absorbing. Wax-based polishes, however, can not only soak into the leather, but also harden on top. According to Leather Honey, wax-based polishes are very difficult to remove from leather, which may be one reason why Katie got such good results with this method: her polish contains wax.
Additional Tips:
- If you are unsure if this method is safe for your leather, test it on a small hidden area first and allow the wax several hours of drying time before testing the results.
- According to Leather Care Compendium by Kim and Axel Himer, the best shoe polish to use is one that does not contain silicone (silicone oil) as ones without it will better allow the leather to air out (breathe). The Kiwi Shoe Polish that Katie used contains wax, which does allow the leather to breathe as long as only a small amount is applied.
- Jeff Brendenberg, author of Clean It Fast, Clean It Right, recommends that if the area is very small (too small for shoe polish to be needed), a permanent marker can be used instead, however he agrees with Katie that for larger areas like hers, shoe polish is the right choice.
- For large sections of missing leather, there are leather patches that can be purchased instead. Find a patch kit online that matches the color of your leather and follow the instructions that come with your kit (usually to cut the patch to match the shape of the missing leather – this can be done by putting a piece of tracing paper over the area, tracing the outline, then cutting out the outline to use as a template for cutting the patch – then applying the patch to the area using the method included for your kit, such as with an adhesive backing patch or a glue).
Sources:
- Katie Ferguson on Instagram
- Ultimate Guide to Leather Care by Leather Honey
- Leather Care Compendium by Kim and Axel Himer
- Clean It Fast, Clean It Right by Jeff Brendenberg


Leave a reply