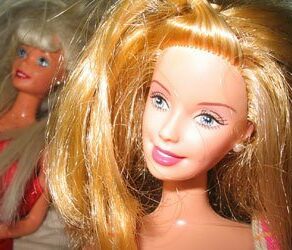
Denise asked: How do I clean the discoloration off of older Barbie dolls which have had their earrings left in too long? The plastic is discolored with the same color as the earrings. I have several 1960s Barbie dolls that had the earrings left in during storage. Unfortunately, the color has gone into the molded plastic. I want to remove this discoloration in order to improve the appearance and of course, this may influence the value.
Vintage Barbie dolls commonly wore earrings. If earrings were not removed, they cause a discoloration of the ear area and side of the head known as “green ear.” This is from a chemical reaction between the metal in the earrings and the plastic. Fortunately, it can be removed or drastically lessened. Prior to treatment, ensure that your doll is vintage, usually they had ponytails or “bubble” haircuts. Modern Barbie dolls are not made of the same materials as vintage dolls and the plastic will become bleached and/or damaged if these methods are used.
You Will Need:
- Remove-Zit or Oxy 10 facial cleanser
- CLR
- Rubbing alcohol
- Cotton balls
- Cotton swabs
- Soft cloths
- Water
- Thin wooden sticks
- Fine needle
- Thread
- Soft towels
Steps to Remove the Discoloration:
- Begin by removing the doll head from the body. It is most effective to treat both the inside and outside of the head. Removing the head will give you access to the inside.
- Use a cotton swab or wooden stick to apply one of the facial cleansers to the stained area. Avoid getting it on the make-up areas or any part this is not stained as it can remove the color from those areas as well.
- Set it to the side and allow the cleanser to dry on the surface. Apply it to the inside of the head as well if there is staining present there.
- When the cleanser has dried and is opaque in color, remove it.
- Repeat with a new application of the cleanser until the staining is gone.
- This method can be lengthy, taking several months to remove the color completely. Persistence is key to successful removal.
- A much quicker method involves the use of CLR (Calcium, Lime and Rust remover). This cleaner is readily available at most supermarkets, hardware and home improvement stores.
- Use a cotton swab to apply the CLR to the interior of the head piece.
- Next, moisten a piece of thread with the cleaner and use a very fine needle to pull the thread through the earring holes. The thread will apply CLR to the inside of the earring holes to clean them as well.
- Moisten a cotton ball with CLR and place it on top of the ear area to cover the stain.
- Allow this to set until the stain is removed. Reapply a newly moistened cotton ball to the ear each day and use a cotton swab to add more cleaner to the interior of the head.
- This method may remove the stain in as little as a week, but sometimes will take longer.
- When the stain is removed, it is no longer necessary to apply the moistened cotton balls or swab the inside of the head.
- Rinse the interior and exterior with rubbing alcohol and then with water.
- Dry completely with a soft cloth.
- Return the head to the top of the doll.
Additional Tips and Ideas
- If the above methods are used on mod dolls, the skin area will have to be repainted to match the original hue.
- Do not place the old earrings back in the doll’s ears. Instead, find a nice alternative that at a local craft store that will not cause discoloration.
- Removing green ear not only makes the doll look better, it increases the value.
- Now that your doll is cleaned, it’s ready to be showcased!


I have heard CLR can help at first, but eventually turn the doll’s head brown and eat up the plastic over time. I would stay away from the CLR method.
Does painting the vintage earrings with clear nail polish prevent this from happening?
But how do I remove the Barbie head without damaging the doll?? I’ve found at least a dozen tutorials, blogs, forums, websites telling how to eliminate or lessen the green staining, but no one tells you how to get the head off?!
Step 1: Remove head.
Step 2: Clean inside of head… etc.
How do I accomplish step 1?!
Elisa,
Here is a good YouTube video that shows a technique for using heat.
For a visual of using the hairdryer techniue mentioned in that video, see this tutorial: Chrissy’s Creative Corner: Off With Barbie’s Head.
Here is another video that I would recommend watching as well. That video goes more in-depth about the different types of neck connectors and one in particular that you should watch out for.
Here is another video that is a very good tutorial for Barbie head removal, however it is easier to understand after watching the other two videos as they more closely show the vinyl neck ridge and various neck connectors.
If using tweezers as described in the first video, I would recommend grabbing by the back of the neck so that any marks or tears that might be caused can be covered by the hair.
All four techniques can be combined if preferred. Here is the process for removing a Barbie head incorporating all mentioned techniques:
Step 1: Push the head down onto the neck.
Step 2: Warm the head/neck by either placing it in hot water for 30 seconds or by heating it with a hair dryer for 30 seconds.
Step 3: Pull the head back up.
Step 4: Turn the head sideways.
Step 5: Pinch the head to better see the neck connector prongs. (Now that the head is sideways, pinch it so that the front of the face and back of the head are being pinched together rather than the sides of the face.) This step might not be possible if your Barbie has a more rigid head material. If that is the case, skip this step.
Step 6: Stick a tool, such as a flathead scewdriver or knitting needle, into the neck area to work the vinyl lip inside the neck over each neck prong. If you are having trouble with this, grabbing the neck with a pair of tweezers as seen in the first video can be done instead. Carefully pull/work the neck over the prongs with the tweezers.
Step 7: Once the head is off over the neck connectors, pull it the rest of the way off (if it isn’t already off).
If you are working with other dolls as well, here is an excellent description with photos of the various types of neck connectors found in dolls: Roxanne’s Dolls: Doll Head Removal. Since the dolls that most often get the green ear are the vintage kind, they likely will not have the neck prongs and removal of the head will be much easier.
Good luck!
ALL this information was helpful. Thanks to all who contributed!!
Happy Holidays …
Erick
I just began collecting vintage Barbies and appreciate all these recommendations and remedies.
Won’t the CLR remove the color also? I’m worried that to try and match her original skin color will not be possible. Thanks so much for any help! This was a very good article! I’m going to checkout YouTube also.
Hi Kathy,
Every doll reacts differently so the only way to be sure is to test a small hidden area first, such as on her scalp or on the back of her neck. Good luck!